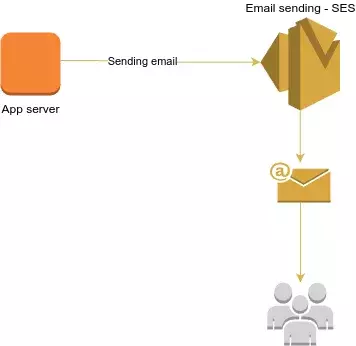
Email notifications can truly transform your web app, keeping users engaged and informed every step of the way. Whether it's activating new accounts, resetting passwords, or simply updating users on important events, integrating AWS SES (Simple Email Service) with your Symfony and React app will streamline the process like a breeze.
In this three-part series on AWS SES, we begin by exploring the core concepts of AWS SES and how you can set it up to send emails from your web application.
We will describe the key steps to seamlessly integrate AWS SES into your Symfony and React application:
Adding identities on AWS
- AWS SES requires us to verify our email addresses or domains to prevent abuse. We add them to SES as identities, verifying ownership so SES can send emails on our behalf.
DNS Configuration
- To ensure secure email transmission, AWS SES generates a public-private key pair, known as DKIM records. We configure our domain's DNS settings by adding these records provided by AWS SES.
Setting up Postfix
- Our application needs to send emails directly, but it can't do so without Postfix on the server. Postfix acts as the intermediary, ensuring emails reach their destinations.
Implementing mail sending with Symfony and Symfony Mailer
- Integrating email functionality into Symfony is easy with Symfony Mailer. By connecting Symfony Mailer to AWS SES, we effortlessly incorporate email sending capabilities, ensuring reliable delivery and a better user experience.
When you complete these steps, you’ll enhance your web application with email functionality and use AWS SES for reliable and scalable email delivery.
Server Side
In this chapter, we'll dive into AWS SES, where we'll create SMTP credentials, verify identities, and set up Postfix on your server to send emails successfully.
AWS SES Configuration
AWS SES (Simple Email Service) is your go-to tool for sending emails reliably and securely at scale.
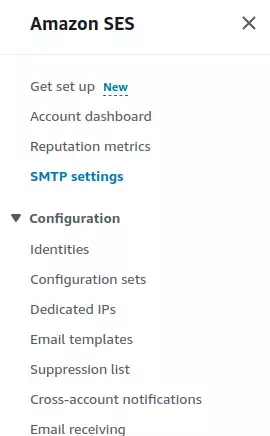
To get started with AWS SES, simply log into your AWS Management Console and navigate to the Services menu. Look for SES (Simple Email Service) and click on it to access the dashboard.
On the left side of the dashboard, you’ll see the sidebar menu. The first thing to do is to create the SMTP credentials. Click on SMTP settings.
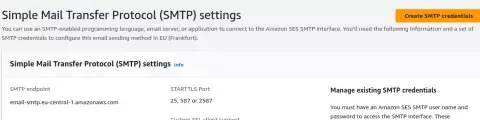
In the Simple Mail Transfer Protocol (SMTP) settings table, you'll find the SMTP endpoint and ports that we will need later for configuring Postfix.
You'll then need to create a user and save the username and password AWS provides you with. We will be adding these credentials to the sasl_passwd file in the Postfix configuration (in the Edit configuration files section), so please ensure you don't misplace them.
Create Identity
Within the SES dashboard, navigate to the left sidebar. Under the "Configuration" section, you'll find "Identities." Click on it to proceed.
Head over to the 'Identities' tab and click on 'Create Identity'. When choosing a domain identity, it's essential to understand a key distinction:
- You should only use email address identities for testing, and you should use a domain identity to achieve optimal deliverability.
- Domain names operate in a case-insensitive manner. This means that if you verify 'example.com', you'll also be able to send from
EXAMPLE.com. However, it's a different story with email addresses. They are case sensitive.
For instance, if you verify[email protected], you won't be able to send emails from[email protected]unless you verify[email protected]separately.
For our email communication, we have selected a domain identity to ensure the highest level of deliverability.
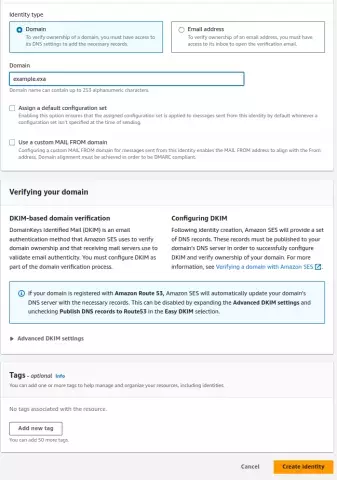
AWS will now guide you through the process of adding your chosen identity. Just follow the prompts.
CNAME Records
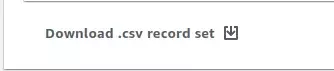
Once you've added your identity, AWS will give you CNAME records. These records prove your email identity to the world. You'll need these records for the next step.
After you’ve created your domain identity with Easy DKIM, you must complete the verification process with DKIM authentication by copying the following generated CNAME records to publish to your domain’s DNS provider.
Easy DKIM in Amazon SES automatically generates keys and adds a DKIM signature to messages, unlike the BYODKIM option where users provide their own keys. This feature simplifies DKIM setup as SES handles the signing process automatically.
DKIM, also known as DomainKeys Identified Mail, acts as a vital layer of security in the email landscape. It guarantees that emails originating from a specific domain are legitimately authorized by the domain owner. Using public-key cryptography, DKIM attaches a distinct signature to each email using a private key. When received, recipient servers reference a publicly available key stored in the domain's DNS to validate the email's integrity, ensuring it remains unchanged during transit.
Publish DNS records:
DNS
Now we need to add some records provided by AWS.
In our next steps, it's important to note that references to DNS records could pertain to either CNAME or TXT records, depending on the form of DKIM you are using. Specifically, for Easy DKIM implementation, which we are proceeding with, we use CNAME records. On the other hand, Bring Your Own DKIM (BYODKIM) involves the use of TXT records. For clarity and precision, detailed verification procedures are provided for each approach, to cover both Easy DKIM and BYODKIM methodologies.
These records will have a name, type, and value.

One thing to note is that in the name field, you'll want to remove the domain because it's already assumed. So instead of something like
tkv3zslfasfamwlks46c3dxhrwzqwgc74._domainkey.ses-test.develomon.com,
it should be tkv3zsl89354235-3ks46c3dxhrwzqwgc74._domainkey.ses-test.
Also, it's important to mention that we're setting up DNS on Cloudflare, and you'll need to disable "Proxy status" so it's in "DNS only" mode.
Now, all we can do is wait while AWS verifies your identity.
Postfix Configuration
Postfix stands out as a robust Mail Transfer Agent (MTA), renowned for its efficiency in handling email routing across UNIX-like systems. Its modular architecture and robust configuration ensure secure data handling, addressing the limitations observed in predecessors like Sendmail.
Featuring a sophisticated queue manager for expedited processing and intuitive administration, Postfix offers both flexibility and compatibility with Sendmail's functionalities. It's a dependable choice for administrators seeking reliability and performance in email delivery.
If you haven't already, launch your favorite package manager - whether it's apt, yum, or brew - and let's get Postfix onboard.
sudo apt install postfix -yOnce installed, let's make sure everything's up and running smoothly:
sudo service postfix status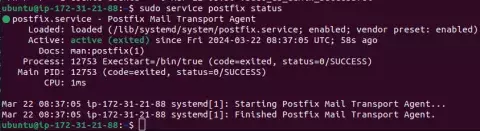
Configure postfix
Configuring Postfix is a crucial step. The command:
sudo dpkg-reconfigure postfixinitiates an interactive setup process, allowing you to customize Postfix according to your specific needs and preferences, ensuring optimal performance and security for your email server.
Follow the steps to setup postfix:
1. Select configuration type
Follow the prompts and select "internet site" as the configuration type, which means that mail is sent and received directly using SMTP.

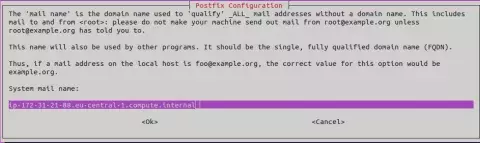
2. Enter the system mail name
When it asks for the system mail name (fully qualified domain name), just insert the appropriate one.
The system mail name is a fully qualified domain name (FQDN) is the complete domain name for a specific computer, or host, on the internet.
By default, postfix provides a default mail name structured as
ip-172-31-21-88.eu-central-1.compute.internal
where compute.internal indicates its association with a domain reserved for internal communication within AWS Virtual Private Clouds (VPCs). This name consists of the internal domain, the service (in this case, compute), the region, and a form of the private IPv4 address. We will proceed using this default mail name.
Now that Postfix is configured with the default settings, the next step is to enable authentication using thellibsasl2-modules library.
3. Enable authentication
Now we’re going to enhance email security. We're installing some key modules with the command:
sudo apt install libsasl2-modules postfixThese modules help with authentication, making sure only the right people can send emails through our server. It's like adding an extra lock to your digital mailbox.
4. Edit configuration files
Let’s tweak configuration. Create the sasl_passwd file with the command:
sudo nano /etc/postfix/sasl_passwd[email-smtp.eu-central-1.amazonaws.com]:587 username:passwordReplace [mail.isp.example] with your AWS SMTP endpoint, and input the username and password provided when you created your SMTP credentials. This step ensures that your email server is securely authenticated, allowing only authorized users to send emails.
Port 587, commonly known as the submission port, is where email clients submit outgoing emails to servers. It's preferred for its widespread support and encryption capabilities, making it ideal for securely sending emails, including through AWS SES.
You can find the ports AWS provides in the Simple Mail Transfer Protocol (SMTP) settings table.
5. Create hash database file:
We create the hash database file (sasl_passwd.db) from sasl_passwd to optimize authentication in Postfix. This enhances security and speeds up the authentication process by converting plaintext passwords into a hashed format for efficient lookup:
sudo postmap /etc/postfix/sasl_passwdThe next step involves modifying the main.cf file by configuring the hostname and relay server.
6. Setup hostname and relay server:
To set up the hostname and relay server, edit the /etc/postfix/main.cf configuration file. Ensure that the myhostname parameter matches the fully qualified domain name (FQDN) you set during installation. Then, update the relayhost parameter to point to your SMTP server's address, typically in the format:
relayhost = [email-smtp.eu-central-1.amazonaws.com]:587Add the line:
sender_canonical_maps = regexp:/etc/postfix/sender_canonicalto your Postfix main.cf file to enable sender canonical mapping. This configuration allows you to define rules in the specified file (/etc/postfix/sender_canonical) to standardize outgoing email addresses, ensuring consistency across sender information in your outgoing messages.
After installation, navigate to the Postfix directory on your server and create a file named sender_canonical:
sudo nano /etc/postfix/sender_canonicalHere, you'll add the email identity verified with AWS SES, essentially authenticating your outgoing emails.
# List of canonical mappings for envelope and header sender addresses


# Map all sender addresses to the default From email address
/.+/ [email protected]
7. Restart postfix
Once all the changes are made, it's time to put them into action. Restart Postfix to ensure that all the modifications take effect:
sudo systemctl restart postfix8. Test SMTP server
To test the SMTP server, you can send an email using the following syntax:
echo "Email body." | mail -s "Email subject" -a "From: [email protected]" [email protected]After sending the email, verify that it was sent successfully by checking the mail log file:
sudo tail -f /var/log/mail.log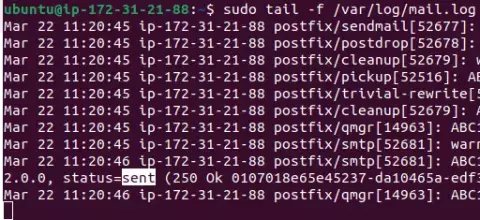
App-side
Now that the server is set up, let's integrate your app with the email-sending functionality.
SymfonyMailer:
Let's integrate Symfony Mailer into our app. Use Composer to pull in the necessary package:
composer require symfony/mailerConfigure SymfonyMailer:
Now, let's configure Symfony Mailer. Navigate to mailer.yaml in your config/packages directory. Just copy and paste the following configuration snippet:
framework:
  mailer:
    dsn: '%env(MAILER_DSN)%'
This snippet configures Symfony to use Mailer with the DSN specified in your environment variables. It's akin to providing your app with a direct pipeline to the email server.
But wait, there's more. Make sure to set up the MAILER_DSN environment variable in your .env file, like so:
MAILER_URL=smtp://localhost:25?encryption=&auth_modeThis configuration informs Symfony to send emails via SMTP, essentially granting your app access to the email kingdom. By specifying localhost:25 in the MAILER_URL, we're instructing Symfony to communicate with the local SMTP server running on port 25, the standard SMTP port, ensuring seamless email delivery.
Now, let's get into the nitty-gritty of generating and dispatching emails. Firstly, ensure Symfony Mailer is properly instantiated within your class. If not, inject it accordingly:
private $mailer;
public function __construct(MailerInterface $mailer) {
    $this->mailer = $mailer;
}
With Symfony Mailer at our disposal, let's craft our email message using the Email class:
$email = (new Email())
    ->from($emailfrom)
    ->to($mailTo)
    ->subject($subject)
    ->text('email body');
Once all parameters are in place, it's time to dispatch the email:
$this->mailer->send($email);And here is a complete example of using Symfony Mailer to send an email message.
use Symfony\Component\Mailer\MailerInterface;

class EmailService
{

  private $mailer;

  public function __construct(MailerInterface $mailer) {
      $this->mailer = $mailer;
  }
  public function sendEmail() {
      $email = (new Email())
          ->from('[email protected]')
          ->to('[email protected]')
          //->cc('[email protected]')
          //->bcc('[email protected]')
          //->replyTo('[email protected]')
          //->priority(Email::PRIORITY_HIGH)
          ->subject('Symfony Mailer Subject!')
          ->text('Symfony Mailer Body.')
          ->html('<p>Modifired HTML message using Symfony Mailer.</p>');

      $mailer->send($email);
  }
}
Thank you for reading! We hope you found this tutorial helpful. Stay tuned for our next article where we'll explore "How to receive emails on Amazon SES" as part of our ongoing AWS SES tutorial series.
We appreciate your feedback and look forward to bringing you more valuable content.