While working on an application where many people are constantly reading from and writing to the database simultaneously, and where the sequence of operations is a crucial factor, there were undesirable consequences in the form of:
- Performance issues
- Compromised data integrity
- A large number of MySQL Deadlock errors
Considering that, for example, if multiple users open multiple pages at the same time, all those pages or requests will be processed in parallel. This is essentially good, but for specific cases, it leads to the problems above. And that's where the Lock mechanism comes into play.
I work in Drupal, so I needed to learn more about Drupal locking mechanisms. In this article, I’ll cover my findings.
First steps first - setting up Memcached
There are many instructions online on how to install Memcached. I like the one made by Digital Ocean because they’re the major player in this area. I’ll cover the basics, but make sure to check the full article on their website.
Make sure your local package index is up to date
Example Codesudo apt updateInstall the package
Example Codesudo apt install memcached(Optional) If you need to examine, test, and manage your memcached server, you might want to install libmemcached-tools
Example Codesudo apt install libmemcached-toolsStart Memcached
Example Codesudo systemctl start memcached
In systems built with Drupal, reducing the load on the MySQL server, specifically on the cache and semaphore tables, or more precisely, transfering the writing and reading of these tables to RAM - means these operations would be handled by Memcached instead of MySQL.
This process improves the response time of the application.

Source: Technosophos
Downloading and configuring Memcached in Drupal
After we have installed Memcache on the server following the instructions above, we can start with the configuration.
First, download the module. If you are using Drupal 8 or higher, the recommended method is via Composer.
composer require 'drupal/memcache:^2.5'(for version 9.1 and above)
After successfully downloading the module, it is necessary to enable/activate before starting with the basic configuration.
The configuration is in the settings.php file. For greater flexibility in different environments (local, dev, production, etc.) I recommend writing the configuration in the settings.local.php file instead of the settings.php file (as the configuration can vary depending on the environment).
Now, add the following configuration:
# Memcache integration.
$memcache_exists = class_exists('Memcache', FALSE);
$memcached_exists = class_exists('Memcached', FALSE);
if ($memcache_exists || $memcached_exists) {
  # Config
  # Local
  $settings['memcache']['servers'] = ['memcached:11211' => 'default'];
  $settings['memcache']['bins'] = ['default' => 'default'];
  $settings['memcache']['key_prefix'] = 'insertanyname';
  $settings['cache']['default'] = 'cache.backend.memcache';
  # Cache Container on bootstrap (pure memcache)
  $class_loader->addPsr4('Drupal\\memcache\\', DRUPAL_ROOT . '/modules/contrib/memcache/src');
  # Define custom bootstrap container definition to use Memcache for cache.container.
  $settings['bootstrap_container_definition'] = [
    'parameters' => [],
    'services' => [
      # Dependencies.
      'settings' => [
        'class' => 'Drupal\Core\Site\Settings',
        'factory' => 'Drupal\Core\Site\Settings::getInstance',
      ],
      'memcache.settings' => [
        'class' => 'Drupal\memcache\MemcacheSettings',
        'arguments' => ['@settings'],
      ],
      'memcache.factory' => [
        'class' => 'Drupal\memcache\Driver\MemcacheDriverFactory',
        'arguments' => ['@memcache.settings'],
      ],
      'memcache.timestamp.invalidator.bin' => [
        'class' => 'Drupal\memcache\Invalidator\MemcacheTimestampInvalidator',
        # Adjust tolerance factor as appropriate when not running memcached on localhost.
        'arguments' => ['@memcache.factory', 'memcache_bin_timestamps', 0.001],
      ],
      'memcache.timestamp.invalidator.tag' => [
        'class' => 'Drupal\memcache\Invalidator\MemcacheTimestampInvalidator',
        # Remember to update your main service definition in sync with this!
        # Adjust tolerance factor as appropriate when not running memcache on localhost.
        'arguments' => ['@memcache.factory', 'memcache_tag_timestamps', 0.001],
      ],
      'memcache.backend.cache.container' => [
        'class' => 'Drupal\memcache\DrupalMemcacheInterface',
        'factory' => ['@memcache.factory', 'get'],
        # Actual cache bin to use for the container cache.
        'arguments' => ['container'],
      ],
      # Define a custom cache tags invalidator for the bootstrap container.
      'cache_tags_provider.container' => [
        'class' => 'Drupal\memcache\Cache\TimestampCacheTagsChecksum',
        'arguments' => ['@memcache.timestamp.invalidator.tag'],
      ],
      'cache.container' => [
        'class' => 'Drupal\memcache\MemcacheBackend',
        'arguments' => ['container', '@memcache.backend.cache.container', '@cache_tags_provider.container', '@memcache.timestamp.invalidator.bin'],
      ],
    ],
  ];
}
Pay attention to the following in the configuration code above:
$settings['memcache']['servers'] = [127.0.0.1:11211' => 'default'];Taking into account that this is an array, we can specify and use multiple memcached servers as needed. If the server is not on the local machine, it is necessary to change the IP of the server. Port 11211 is the default port for Memcached.
An example with multiple servers
$settings['memcache']['servers'] = [
     'server1:port' => 'default',
     'server2:port' => 'default',
     'server3:port' => 'cluster1',
     'serverN:port' => 'clusterN',
     'unix:///path/to/socket' => 'clusterS',
];
$settings['memcache']['key_prefix'] = 'insert_name';
key_prefix is an arbitrary prefix, it's sufficient that it makes sense to you so you can recognize what it refers to.
$settings['memcache']['bins'] = ['default' => 'default'];For starters, even if you don't have this line, Memcached will certainly assume that the cluster is default. To navigate easier, it wouldn't hurt to write it. As needed, this can be configured in a way that suits you best, like for example:
$settings['memcache']['bins'] = [
	'default' => 'default',
	'cache_filter' => 'cluster2',
	'cache_menu' => 'cluster2'
	'session' => 'cluster3',
	'users' => 'cluster4'
];
But for this case, default is quite sufficient.
After this, we need one more step to complete the basic Memcache configuration.
In the services.yml file, it is necessary to add the following:
#Memcache
services:
 # Timestamp invalidation service used for invalidation logic.
 memcache.timestamp.invalidator.tag:
   class: Drupal\memcache\Invalidator\MemcacheTimestampInvalidator
   # Remember to use the same bin as the bootstrap container if you are using it!
   # Adjust tolerance factor as appropriate when not running memcache on localhost.
   arguments: ['@memcache.factory', 'memcache_tag_timestamps', 0.001]
 # Cache tag checksum backend. Used by memcache and most other cache backends
 # to deal with cache tag invalidations.
 cache_tags.invalidator.checksum:
  class: Drupal\memcache\Cache\TimestampCacheTagsChecksum
  arguments: ['@memcache.timestamp.invalidator.tag']
  tags:
    - { name: cache_tags_invalidator }
 # Replaces the default lock backend with a memcache implementation.
 lock:
   class: Drupal\Core\Lock\LockBackendInterface
   factory: ['@memcache.lock.factory', get]
Once we have completed this, it is advisable to clear the cache with the drush cr command or from the interface.
To visually check through the UI whether our memcache is working, we can do so by enabling the memcache_admin module and checking the option "Show memcache statistics at the bottom of each page" in its configuration.
After this, for testing purposes, clear the cache. When you open any page, you’ll see something similar to this.
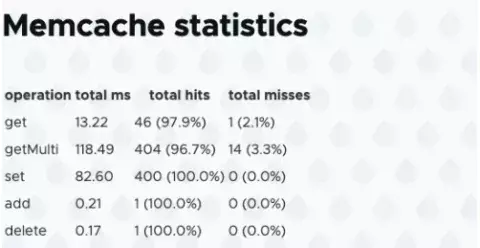
Attention should be paid to total hits and total misses because we cleared the cache before loading the page, and naturally, there is a cache miss as actually during the display of this page what is defined in the configuration is recorded in Memcache as shown in the first graph.
When you refresh this page and if everything is set up correctly, you’ll see something similar.
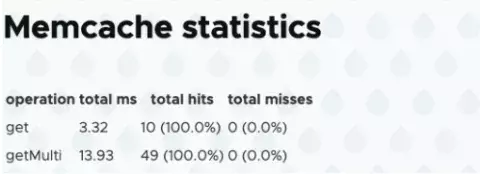
If the total hits are at 100% and total misses are at 0%, it means that Memcache is correctly configured and that the information has been returned from the cache instead of from the backend.
As far as setting up Memcache, that's it, now you can disable/deactivate the memcache_admin module as you will mostly need it the next time when there is a problem 🙂.
Using Drupal Lock Mechanism for a semaphore table
And now let's move on to the final part, which is using the Drupal lock mechanism for the semaphore table.
Although the previous preparation steps might seem quite long, the actual implementation of the lock for the part of the code (that I needed to execute in 1 by 1 request, instead of the default parallel way) is extremely simple.
It is necessary to call the static function Drupal::lock() in the following way:
$lock = \Drupal::lock();After that, you could do the following if needed:
if ($lock->acquire('custom_lock_name', 3)) {
// Code that needs to be executed
$data = method_to_be_executed();
$lock->release('custom_lock_name');
} else {
// logic in case the lock isn’t available on request
}
Let’s focus on the first line in our snippet above > $lock->acquire(‘parameter1’, $parameter2)
$parameter1 is actually an arbitrary machine name of the lock that you need to understand what it refers to. The $parameter2 is the timeout of the lock whose smallest value can be 1ms, but it is advisable to actually measure the duration of the code that needs to be executed within the lock so that $parameter2 can be adjusted to your code.
Because if your code executes on average in 500ms, and the timeout i.e., $parameter2 is set to 100ms, you will not get the desired results.
Once the code within the lock has been executed, do the release $lock->release('custom_lock_name');
If the code is executed before the lock's timeout, it will be released sooner and will speed up the application itself.
You can use multiple locks - as $parameter1 is arbitrary, but again be careful as a small mistake can cause the problems you are trying to solve.
It’s not so complicated to use lock mechanisms, right?
If this looks simple to you, it's because it is. Of course, this can easily become complicated and it requires a lot of attention and measurement, as well as revalidating the logic of the application you are creating.
It’s possible that for x reasons at some point you need a specific application for the lock, but that's all part of the job.
Depending on the problem you are solving, it is advisable to create a fallback in case the lock has not yet been released, as for example:
}
else {
	// logic if the lock is not available at the time of the request
	$this->method_in_case_of_lock();
}
This is just a basic example of using Memcache and the Drupal lock mechanism. There can be a million variations on all this, but I hope it will help someone at least a little if there is a need to use this.